Your cart is currently empty.


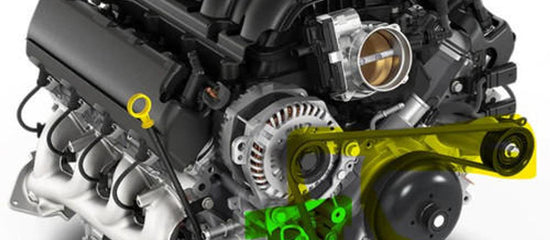
You can bolt in the most capable high output alternator on the market, but if it's still connected through factory wiring sized for a 130-amp unit, you've built a bottleneck. The Big 3 wiring upgrade is the inexpensive, essential companion to any high output alternator — and many manufacturers require it to keep your warranty valid. Here's what it is and why it matters.
Your factory charging wires were sized for your factory alternator. Push 250, 300, or 400 amps through cabling designed for a fraction of that, and three things happen:
The alternator isn't the only part of the circuit. The wiring has to match.
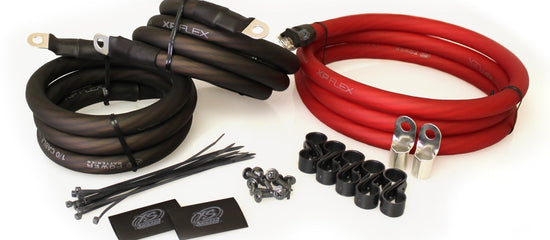
The Big 3 upgrades the three most important cables in your charging system with heavy-gauge wire (commonly 1/0 gauge, sometimes 4 gauge depending on the build):
The principle: a circuit is only as strong as its weakest conductor, and ground paths matter just as much as the positive side. Upgrading only the positive cable and ignoring the grounds is a half-finished job.
Many builders buy a pre-assembled Big 3 kit so the cable, lugs, and hardware are matched and the right lengths — we can set you up with one sized for your vehicle.
This is a confident-DIYer job, but the details matter:
Clean, tight, corrosion-free connections at bare metal are the single biggest factor in whether the upgrade actually works.
Is the Big 3 really necessary, or is it optional? For a high output alternator, treat it as necessary. Many manufacturers — Mechman included — expect upgraded wiring, and some tie warranty coverage to it. It also protects your investment by letting the alternator perform as designed.
Can I do the Big 3 myself? Yes, if you're comfortable with basic wiring, crimping heavy lugs, and working safely around the battery. The hard part isn't complexity — it's doing every connection cleanly and protecting the main run with a fuse or breaker.
What gauge wire should I use? 1/0 gauge is the common choice for high-amperage builds. The right size depends on your alternator's output and run length — when in doubt, go heavier.
Do I need to remove the factory wiring? Usually no. The Big 3 typically runs in parallel with the factory wires, adding capacity rather than replacing it.
A high output alternator and the Big 3 wiring upgrade are a package deal. The alternator generates the power; the wiring delivers it safely. Skipping the wiring means voltage drop, heat, and an alternator that can't do its job — for a fraction of the alternator's cost.


Not to worry, we got you! Let’s get you a new password. Please enter your email address or your Username.